1st Level – Survive
i→ Insert mode. Type ESC to return to Normal mode.x→ Delete the char under the cursor:wq→ Save and Quit (:w save, :q quit)dd→ Delete (and copy) the current linep→ Paste
Recommended:
hjkl(highly recommended but not mandatory)→basic cursor move (←↓↑→). int: j looks like a down arrow.:help <command>→ Show help about<command>. You can use :help without a<command>to get general help.
2nd Level – Feel comfortable
-
Insert mode variations
a→ insert after the cursor
o→ insert a new line after the current one
O→ insert a new line before the current one
cw→ replace from the cursor to the end of the word -
Basic moves
0→ go to the first column
^→ go to the first non-blank character of the line
$→ go to the end of line
g_→ go to the last non-blank character of line
/pattern→ search forpattern -
Copy/Paste
P→ paste before, rememberpis paste after current position
yy→ copy the current line, easier but equivalent toddP -
Undo/Redo
u→ undo
<C-r>→ redo -
Load/Save/Quit/Change File (Buffer)
:e <path/to/file>→ open
:w→ save
:saveas <path/to/file>→ save to <path/to/file>
:x,ZZor:wq→ save and quit (:x only save if necessary)
:q!→ quit without saving, also::qa!`` to quit even if there are modified hidden buffers.:bn(resp.:bp`) → show next (resp. previous) file (buffer)
3rd Level – Better. Stronger. Faster.
Better
.→ (dot) will repeat the last command,N<command>→ will repeat the command N times.
Some examples, open a file and type:
2dd→ will delete 2 lines3p→ will paste the text 3 times100idesu [ESC]→ will write “desu desu desu desu desu desu desu desu desu desu desu desu desu desu desu desu desu desu desu desu desu desu desu desu desu desu desu desu desu desu desu desu desu desu desu desu desu desu desu desu desu desu desu desu desu desu desu desu desu desu desu desu desu desu desu desu desu desu desu desu desu desu desu desu desu desu desu desu desu desu desu desu desu desu desu desu desu desu desu desu desu desu desu desu desu desu desu desu desu desu desu desu desu desu desu desu desu desu desu desu”.→ Just after the last command will write again the 100 “desu”.3.→ Will write 3 “desu” (and not 300, how clever).
Stronger
- N
G→ Go to line N gg→ shortcut for 1G - go to the start of the fileG→ Go to last line- Word moves:
w→ go to the start of the following word,e→ go to the end of this word.By default, words are composed of letters and the underscore character. Let’s call a WORD a group of letter separated by blank characters. If you want to consider WORDS, then just use uppercase characters:
W→ go to the start of the following WORD,E→ go to the end of this WORD.
Now let’s talk about very efficient moves:
%: go to the corresponding(,{,[.*(resp.#) : go to next (resp. previous) occurrence of the word under the cursor
Faster
Remember about the importance of vi moves? Here is the reason. Most commands can be used using the following general format:
<start position><command><end position>
For example : 0y$ means
0→ go to the beginning of this liney→ yank from here$→ up to the end of this line
We also can do things like ye, yank from here to the end of the word. But also y2/foo yank up to the second occurrence of “foo”.
But what was true for y (yank), is also true for d (delete), v (visual select), gU (uppercase), gu (lowercase), etc…
4th Level – Vim Superpowers
Move on current line: 0 ^ $ g_ f F t T , ;
0→ go to column 0^→ go to first character on the line$→ go to the last columng_→ go to the last character on the linefa→ go to next occurrence of the letteraon the line.,(resp.;) will find the next (resp. previous) occurrence.t,→ go to just before the character,.3fa→ find the 3rd occurrence ofaon this line.FandT→ likefandtbut backward.
A useful tip is: dt" → remove everything until the ".
Zone selection <action>a<object> or <action>i<object>
These command can only be used after an operator in visual mode. But they are very powerful. Their main pattern is:
<action>a<object> and <action>i<object>
Where action can be any action, for example, d (delete), y (yank), v (select in visual mode). The object can be: w a word, W a WORD (extended word), s a sentence, p a paragraph. But also, natural character such as ", ', ), }, ].
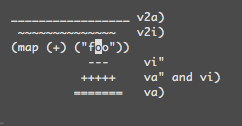
Suppose the cursor is on the first o of (map (+) ("foo")).
vi"→ will selectfoo
va"→ will select"foo"
vi)→ will select"foo"
va)→ will select("foo")
v2i)→ will selectmap (+) ("foo")
v2a)→ will select(map (+) ("foo"))
Select rectangular blocks: <C-v>
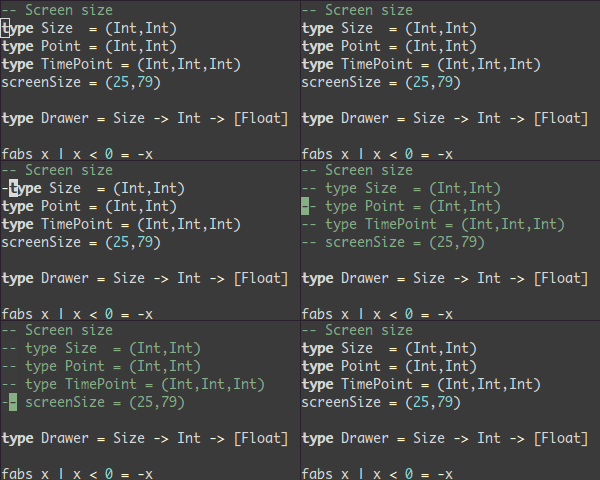
Rectangular blocks are very useful for commenting many lines of code. Typically: 0<C-v><C-d>I-- [ESC]
^→ go to the first non-blank character of the line<C-v>→ Start block selection<C-d>→ move down (could also be jjj or %, etc…)I-- [ESC]→ write--to comment each line
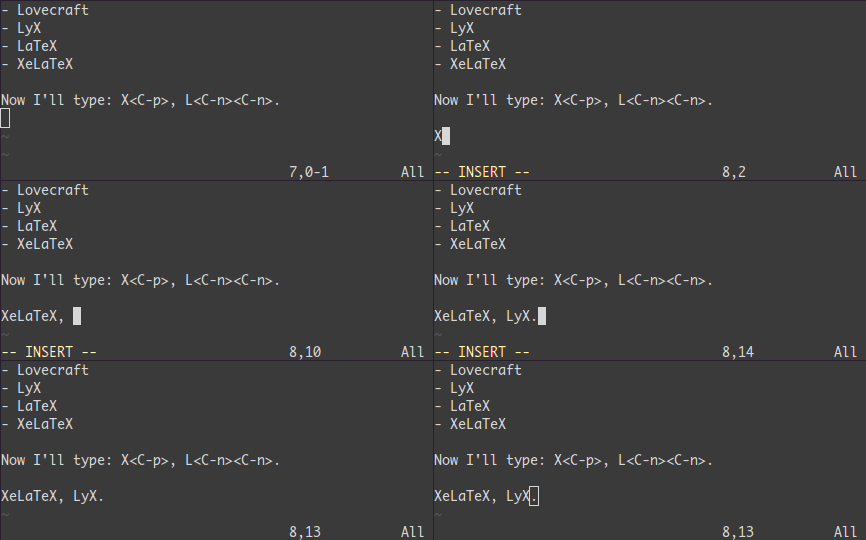
Completion: <C-n> and <C-p>
In Insert mode, just type the start of a word, then type <C-p>, magic…
Macros : qa do something q @a @@
qa record your actions in the register a. Then @a will replay the macro saved into the register a as if you typed it. @@ is a shortcut to replay the last executed macro.
Example
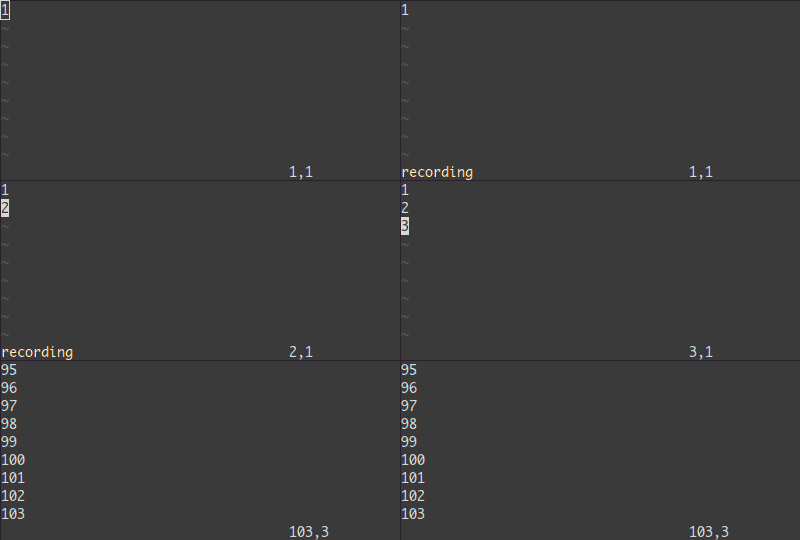
On a line containing only the number 1, type this:
qaYp<C-a>q→
qastart recording.Ypduplicate this line.<C-a>increment the number.qstop recording.
@a→ write 2 under the 1
@@→ write 3 under the 2
Now do100@@will create a list of increasing numbers until 103.
Visual selection: v V <C-v>
We saw an example with <C-v>. There is also v and V. Once the selection has been made, you can:
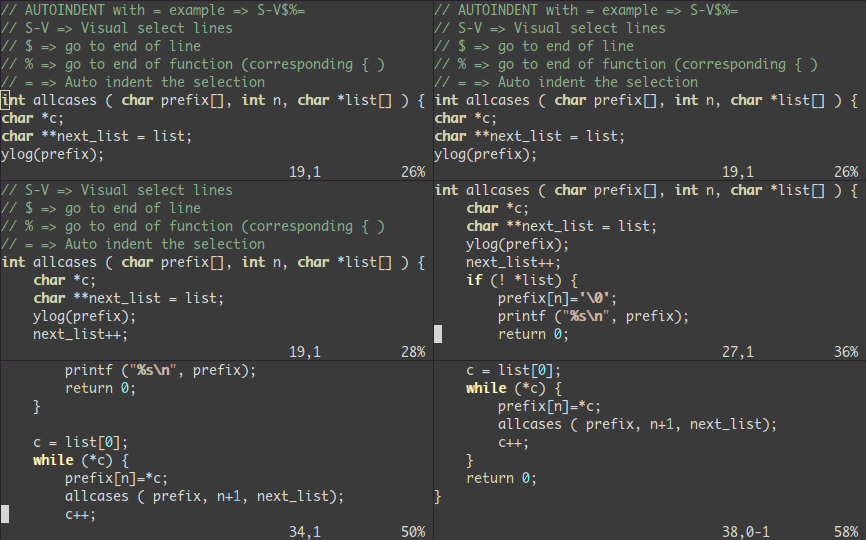
J→ join all the lines together.<(resp.>) → indent to the left (resp. to the right).=→ auto indent
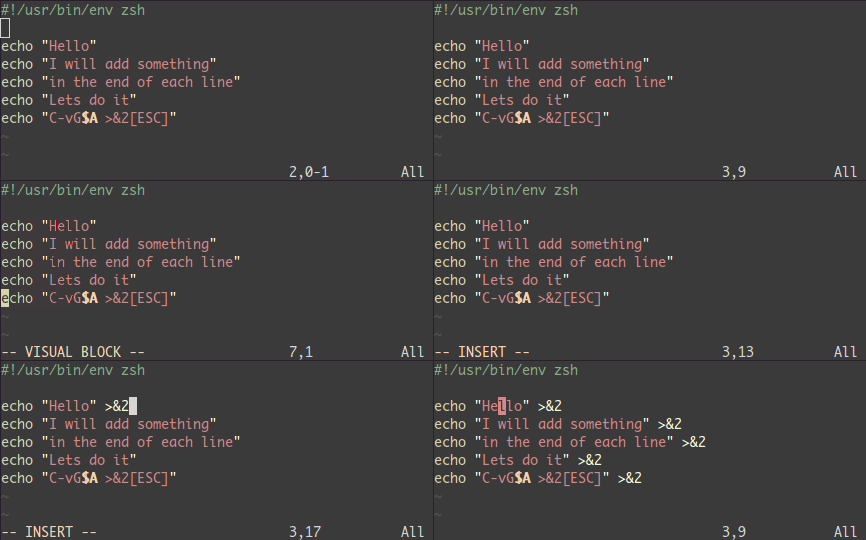
Add something at the end of all visually selected lines:<C-v>- go to desired line (
jjjor<C-d>or/patternor%etc…) $go to the end of the lineA, write text,ESC.
Splits: :split and vsplit
These are the most important commands, but you should look at :help split.
:split→ create a split (:vsplit create a vertical split)<C-w><dir>: where dir is any of hjkl or ←↓↑→ to change the split.<C-w>_(resp.<C-w>|) : maximise the size of the split (resp. vertical split)<C-w>+(resp.<C-w>-) : Grow (resp. shrink) split
Reference:
http://yannesposito.com/Scratch/en/blog/Learn-Vim-Progressively/
http://www.runoob.com/w3cnote/all-vim-cheatsheat.html
http://www.runoob.com/linux/linux-vim.html
https://vim.rtorr.com/




v1.5.2